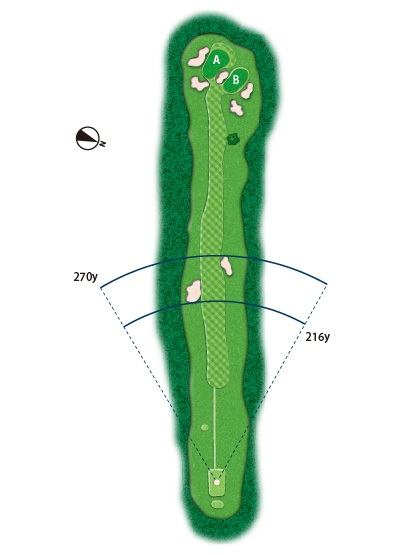
| Green | A | B |
|---|---|---|
| Full Back | 507y | 496y |
| Back | 507y | 496y |
| Regular | 497y | 486y |
| Front | 497y | 486y |
| Ladies | 454y | 443y |


| Green | A | B |
|---|---|---|
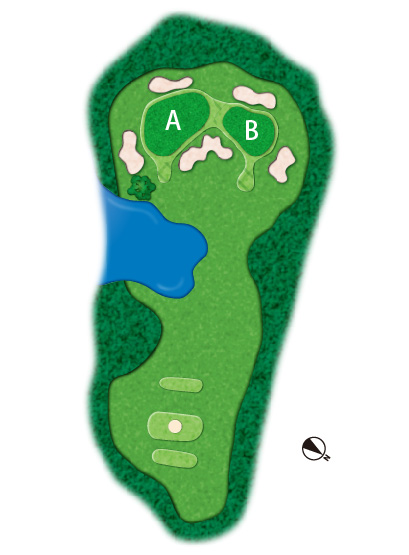
| Full Back | 413y | 388y |
| Back | 413y | 388y |
| Regular | 385y | 360y |
| Front | 357y | 337y |
| Ladies | 357y | 337y |
| Green | A | B |
|---|---|---|
| Full Back | 186y | 181y |
| Back | 158y | 153y |
| Regular | 141y | 136y |
| Front | 122y | 117y |
| Ladies | 122y | 117y |


| Green | A | B |
|---|---|---|
| Full Back | 341y | 322y |
| Back | 341y | 322y |
| Regular | 320y | 301y |
| Front | 298y | 279y |
| Ladies | 298y | 279y |
| Green | A | B |
|---|---|---|
| Full Back | 425y | 397y |
| Back | 390y | 362y |
| Regular | 357y | 329y |
| Front | 357y | 329y |
| Ladies | 357y | 329y |

| Green | A | B |
|---|---|---|
| Full Back | 434y | 402y |
| Back | 434y | 402y |
| Regular | 409y | 377y |
| Front | 384y | 352y |
| Ladies | 347y | 315y |
| Green | A | B |
|---|---|---|
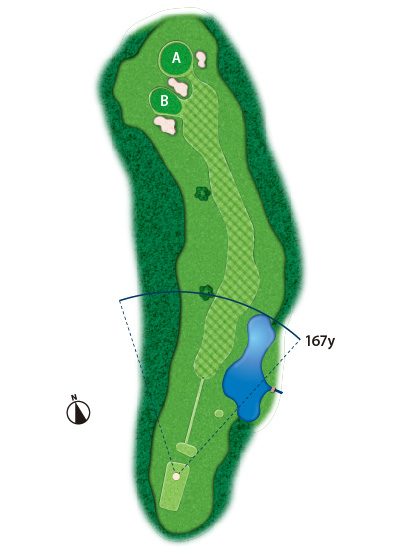
| Full Back | 195y | 208y |
| Back | 169y | 181y |
| Regular | 146y | 159y |
| Front | 126y | 139y |
| Ladies | 126y | 139y |
| Green | A | B |
|---|---|---|
| Full Back | 583y | 573y |
| Back | 563y | 553y |
| Regular | 514y | 503y |
| Front | 489y | 478y |
| Ladies | 489y | 478y |

| Green | A | B |
|---|---|---|
| Full Back | 469y | 453y |
| Back | 446y | 430y |
| Regular | 418y | 401y |
| Front | 393y | 377y |
| Ladies | 360y | 344y |
| Green | A | B |
|---|---|---|
| Full Back | 550y | 517y |
| Back | 550y | 517y |
| Regular | 530y | 497y |
| Front | 509y | 475y |
| Ladies | 464y | 430y |

| Green | A | B |
|---|---|---|
| Full Back | 171y | 171y |
| Back | 171y | 171y |
| Regular | 156y | 156y |
| Front | 134y | 134y |
| Ladies | 134y | 134y |

| Green | A | B |
|---|---|---|
| Full Back | 425y | 407y |
| Back | 411y | 393y |
| Regular | 382y | 364y |
| Front | 361y | 343y |
| Ladies | 361y | 343y |

| Green | A | B |
|---|---|---|
| Full Back | 454y | 443y |
| Back | 442y | 431y |
| Regular | 417y | 406y |
| Front | 394y | 383y |
| Ladies | 354y | 342y |
| Green | A | B |
|---|---|---|
| Full Back | 570y | 546y |
| Back | 551y | 527y |
| Regular | 513y | 488y |
| Front | 491y | 466y |
| Ladies | 447y | 422y |

| Green | A | B |
|---|---|---|
| Full Back | 359y | 340y |
| Back | 347y | 328y |
| Regular | 325y | 306y |
| Front | 301y | 282y |
| Ladies | 301y | 282y |

| Green | A | B |
|---|---|---|
| Full Back | 369y | 370y |
| Back | 369y | 370y |
| Regular | 348y | 349y |
| Front | 326y | 327y |
| Ladies | 326y | 327y |


| Green | A | B |
|---|---|---|
| Full Back | 189y | 190y |
| Back | 189y | 190y |
| Regular | 168y | 169y |
| Front | 153y | 155y |
| Ladies | 153y | 155y |

| Green | A | B |
|---|---|---|
| Full Back | 420y | 395y |
| Back | 420y | 395y |
| Regular | 395y | 370y |
| Front | 373y | 348y |
| Ladies | 373y | 348y |

| Green | A | B |
|---|---|---|
| Full Back | 424y | 408y |
| Back | 404y | 388y |
| Regular | 382y | 366y |
| Front | 366y | 350y |
| Ladies | 366y | 350y |
| Green | A | B |
|---|---|---|
| Full Back | 219y | 230y |
| Back | 219y | 230y |
| Regular | 198y | 209y |
| Front | 164y | 175y |
| Ladies | 164y | 175y |

| Green | A | B |
|---|---|---|
| Full Back | 523y | 513y |
| Back | 523y | 513y |
| Regular | 497y | 486y |
| Front | 497y | 486y |
| Ladies | 434y | 423y |
| Green | A | B |
|---|---|---|
| Full Back | 400y | 365y |
| Back | 379y | 344y |
| Regular | 361y | 326y |
| Front | 337y | 301y |
| Ladies | 337y | 301y |
| Green | A | B |
|---|---|---|
| Full Back | 408y | 387y |
| Back | 408y | 387y |
| Regular | 391y | 369y |
| Front | 370y | 349y |
| Ladies | 342y | 321y |
| Green | A | B |
|---|---|---|
| Full Back | 192y | 185y |
| Back | 192y | 185y |
| Regular | 169y | 164y |
| Front | 134y | 132y |
| Ladies | 134y | 132y |


| Green | A | B |
|---|---|---|
| Full Back | 475y | 454y |
| Back | 442y | 420y |
| Regular | 415y | 393y |
| Front | 376y | 355y |
| Ladies | 376y | 355y |
| Green | A | B |
|---|---|---|
| Full Back | 389y | 386y |
| Back | 359y | 356y |
| Regular | 345y | 342y |
| Front | 325y | 322y |
| Ladies | 325y | 322y |


| Green | A | B |
|---|---|---|
| Full Back | 551y | 554y |
| Back | 529y | 532y |
| Regular | 508y | 511y |
| Front | 475y | 477y |
| Ladies | 443y | 445y |